
12 Tomato Planting Hacks
By Elizabeth Jones
April 2020
I grew up with homegrown tomatoes. We made our own salsa, canned our own tomato juice (which made the best chili and soups) and made so many other dishes with fresh tomatoes.
At the Jefferson Seed Library, tomatoes are classified as INTERMEDIATE to grow. Unlike vegetables which are EASY to grow, like beans, tomatoes take a bit of work.
Hack #1
Plant Late
There are 2 basic kinds of tomatoes. Determinate and Indeterminate. Determinate will produce tomatoes all at once. Indeterminate will produce tomatoes throughout the growing season. I like to have both kinds.
While you can transplant tomatoes after the danger of frost, I have found my tomatoes will do best if I plant them between the Spring and Fall planting times. This puts planting around May 1st.
By waiting till May 1st to transplant, I have less problems with aphids and I’m done with all my canning and freezing by the time the Eastern Leaf-footed Bug plague arrives. I will let them have the tomatoes at this point because it helps keep them out of the rest of my garden.

Hack #2
To Pot or Not to Pot
You can grow tomatoes in pots, but you need a VERY large pot AND the RIGHT VARIETY. Not all tomatoes work in pots. A good rule of thumb is: if your tomato’s max growth is 3 feet, you can grow it in a pot that holds about 2 cubic feet of dirt (5 gal). Anything taller, the root system is so big you will be better off digging a hole in the backyard.
Hack #3
Plant in the Yard
Tomatoes are the only plant in my garden that are planted directly in the ground. Everything else is planted in raised beds.
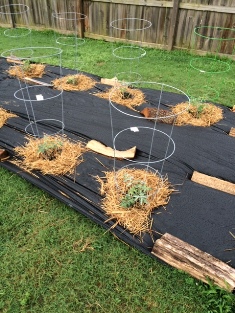
This year for my tomato field, I cleared the area by killing the grass. I did that during the winter months by laying down wood, mulch bags, anything which would block sunlight. Then it was just a matter of keeping the area free from weeds until planting time.
You don’t have to go to this much work, however. You could use landscape fabric, like I did my first year, (it’s just more money) or cardboard to accomplish the same thing. (See my Garden Experiments 2020 for why I chose to not use cardboard for my tomato field this year.)
Hack #4
Egg Shells
Space your holes/plants around 3 feet apart.
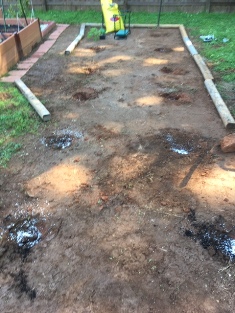
I usually dig my holes in advance because it’s easier to dig in clay soil when it is moist. If you wait until it’s planting time in GA, the soil is typically dry and you’ll be digging for a good long time. I learned this the hard way my first year planting. It took me HOURS to dig 12 holes. Because of that, it’s not uncommon for me to dig my tomato holes in February, which is GA’s rainiest month.
I place in the bottom of each hole ground egg shells. Tomatoes and peppers can experience blossom end rot. This is where the fruit will rot on the plants. I learned this is caused by a calcium deficiency. Instead of buying calcium for plants, I save my eggshells. It takes months for eggshells to break down in the soil. So, it’s not a quick fix.
But, if you place egg shells in the bottom of the holes, as the plant grows over months, the calcium which has been breaking down over those same months, will then be available for the roots to take up.
Hack #5
Epson Salt
Add about a 1-2 Tablespoons of Epson Salt to the bottom of the holes as well. This acts as a fertilizer giving your tomatoes a quick boost.
JUST be sure to mix it into the soil so that it doesn’t burn the roots. ALSO, make sure you use plain Epson salt and not one with scents or other additives as this can be harmful to tomatoes.
Hack #6
Plant the Stem
With tomatoes, you can bury part of the stem in the ground. Each of the little “hairs” on the stem will form surface roots. These surface roots will give the plants additional stability.
“A large, vigorous tomato plant requires a correspondingly robust root system. Such plants need less water and can stand up to the wind and rains of summer storms. Fine hairs lining tomato seedling stems are all capable of developing into roots. Therefore, the greater the stem portion buried at planting time, the bigger the potential root system. If more of the root mass is close to the surface, roots will stay warmer, thus improving plant growth and production” (homeguides.sfgate.com).
Place the root ball on the egg shells and back fill the hole, burying part of the stem, with garden soil. Gently press down.
Hack #7
Wire the Cages Together
Even with surface roots, tomatoes still need support. It is a good idea to cage tomatoes at the time of planting so there will be no root disturbance. It will also help you keep the tomato leaves from touching the ground–more to come on why this is VERY important later.
You will need to know how tall your tomatoes will grow to know what size cage you will need. I can remember one REALLY GOOD year, growing up, where the tomatoes grew over 8 feet tall! Granted that’s a rarity, but know your growing height.
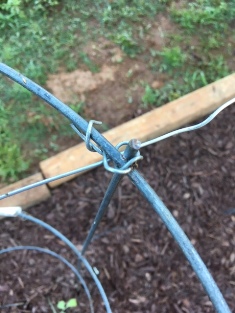
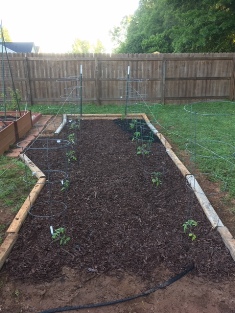
I go the extra step of wiring my tomato cages together. This adds further stability and helps prevent cages from flopping over during a thunderstorm.
I have two rows of tomatoes. At the end of each row is a 6′ fence post. I take bailing wire and thread it through the cages, pulling it as tight as I can, securing both ends to the posts. Then I secure the wire to the cages just like I did when I made my trellis.
Hack #8
Soaker Hoses
After you’ve placed your cages, lay down your soaker hoses. You will want do this after the cages are placed so you don’t puncture your hoses with the cages.
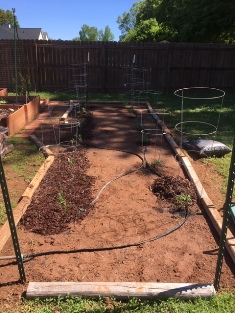
Soaker hoses are a MUST for tomatoes. You need to bottom water right at the roots. If you water from above, this will make plants susceptible to disease and pests. When soil splashes up on the leaves it could (most likely will) introduce some kind of disease to the plant. This is also why good spacing is also important.
Think of tomatoes like people. If one plant has a disease and it’s touching a healthy plant–then it won’t be long be for the healthy plant has the disease too.
You can hand-water, I did that my first year. I’ve since invested in soaker hoses–much less work.
Hack #9
Mulch
Mulch is also a MUST for tomatoes. A good layer of mulch will prevent soil from splashing up on the plant.
Even if you use soaker hoses, rain happens. Mulch is also good for all the normal reasons: moister retention, soil improvement etc.
I’m trying wood mulch this year, but any kind of organic mulch (wood chips, pine needles, straw) is good.

Hack #10
Pruning
In certain parts of the country you may be able to get way with not pruning, but in GA, I think it’s a MUST.
This is why. Tomatoes need good airflow to help prevent fungus. In GA, where humidity is high, the plant needs help with air circulation. ALWAYS use clean tools for pruning. Dirty tools can introduce disease.
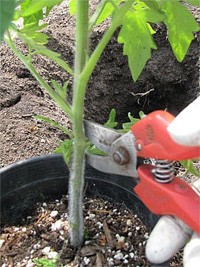
Using clean tools or clean hands, cut or pinch off any leaves which are touching ground (even if it’s mulched). This will help prevent any diseases from the soil being introduced to the plants.
Any soil that gets on leaves is practically a guaranty that the plant will get a disease and/or fungus.
As the plant grows, you will want to keep trimmed the bottom layers of leaves.
For more information about the benefits of pruning click here.
Hack #11
Even Watering
Tomatoes are very sensitive to changes in watering. They like schedules and a good slow soaking. I water my tomatoes every other day.(But always water biased on the need of the plant.) If you planted in pots, you will need to water more often as pots dry out more quickly.
Keep an eye on the weather. You will want to know if there is a chance of rain. If you don’t get the promised rain, make sure you water as soon as possible. Also, having a rain gauge is extremely helpful. This way if you do get rain, you will know how much rain you got to know if it was enough to skip watering or if you still need to water.
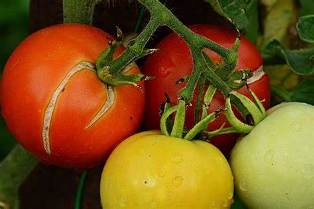
Uneven watering (getting a lot of water one day, then little water the next few days, then lots of water the next or any combination) can lead to splitting, not very juicy fruit, not good fruit production, poor root system, rotting fruit, leaf curl, susceptibility to pests and of course…the dreaded disease.
Picky, aren’t they!
So bottom line…water on a schedule, water at the base, and give a slow soak.
Hack #12
Rotation
Crop rotation is a good practice no matter the size garden you have. Tomatoes are the only vegetable I plant directly into the soil. The rest are in raised beds (but even these get rotated around every year).
Tomato roots can become infested with nematodes. Nematodes steal the nutrients from the tomatoes by taking them directly from the roots. This can cause, yellowing and stunted growth.
Nematodes live in the soil, so there is no way to avoid them. However, you can decrease the harmful effects of nematodes by using crop rotation.


For the home gardener crop rotation is usually enough to care of this problem.
When you pull up your tomatoes plants in the fall, before you compost them, look at the roots. Do you have any knobs on the roots?
If you don’t have many, you can probably get way with another year of planting in the same place. If you have knobby things on the roots, let the land lay fallow for a year or two and choose a different location to plant for next year. You can also try companion planting or trap cropping to help with nematodes.
With all the work which is involved in taking care of tomatoes, you can see why it’s classified as INTERMEDIATE to grow. But, no matter the work, it’s totally worth it to have fresh homegrown tomatoes!