Trap Cropping
What is is and how to do it!

Using trap crops works! This technique is one part of pest management. When using the methods and strategies detailed below, you will find that you will (1) reduce the damage in the plant you want to protect and (2) either reduce or eliminate the need for chemicals in your garden!
I’ve been using methods of trap cropping in my home vegetable and flower gardens for years. It does require both planning ahead and patience as this method is not a magic wand. But, with a little knowledge, you too can limit the damage in your main crop and reduce and hopefully eliminate pesticides in your garden!
What is Trap Cropping?
The basic definition is, trap crops are sacrificial plants that are used to draw pests away from cash crops or the plant you want to protect. The cash crop can be either a flower or vegetable that often has pest problems, such as roses or zucchini. The trap crop is a flower or vegetable that you are using to draw away the pests from the main crop in order to ‘trap’ them. Then the pests can be more easily dealt with.
The purpose of this technique is threefold.
- To limit the damage in the main crop.
- To concentrate pests in one area, so they are more easily dealt with.
- To either reduce or eliminate the use of pesticides in the main crop.
This isn’t a new idea, it’s rather an old technique. It’s one more tool you can stick in your tool belt to deal with pests. When trap crops are combined with other pest management methods, they add an additional layer of protection to whatever crops or plants you want to protect.


How it works
Insects have food preferences too!
Trap cropping works like this. If an insect likes one plant, but it really loves another plant, you want to use the plant it really loves to protect the plant it only likes.
Plants produce chemicals called volatiles. Many plants reproduce through insect pollination. Plants use these volatiles to attract insects often for the purpose of reproduction. Sometimes plants use these volatiles to repel insects, but that is companion planting and not trap cropping.
Plants will produce these chemicals in varying degrees throughout their life cycle. Some varieties produce more volatiles or produce them more strongly than other varieties making that specific variety more attractive.
Regardless of the kind of plant, it is most attractive at the reproduction stage of life (flowering and producing fruit) as this is when the plant is trying its hardest to attract pollinators.
This is what trap cropping takes advantage of. It takes the insects’ food preferences and turns that preference against them.

Basic Principles
There are 3 basic principles to trap cropping.
1. Use a different species than the one you want to protect.
Example: Using sunflowers to protect tomatoes.
2. Use a different variety of the species you want to protect.
Example: Using black beauty zucchini to protect lemon zucchini.
3. Use the same species and variety but at a different stage of growth.
Example: Using black beauty zucchini, that was planted a minimum of 2-3 weeks before the main crop, to protect the main crop of black beauty zucchini.
The Different Methods of Trap Cropping and what I found worked best for me
The three methods are (1) border, (2) intercropping or blocks, and (3) mixed.
1. The border method

It’s exactly what it sounds like. The trap crop creates a border around the plant or crop you are trying to protect. The idea is the pest will ‘run’ into the border and not want to cross over. The trap crop’s chemicals are more enticing than finding out what lies beyond the border.
You will see the border method often employed by farms. But it can be easily adapted for the home gardener. Say you live next to a field and you know many of your pest problems come from this field. You don’t need to plant a 360-degree border. One ‘wall’ between the field and your crop should be sufficient to keep the majority of the insects enticed by the trap crop ‘wall’.
I use a 360-degree border of nasturtium to protect my black-eyed peas from aphids in a 4 x 8 foot raised bed. I always choose a non-vining or bush variety of nasturtium. As the black-eyed peas vine, I don’t want any vining flowers to climb up the trellis with the peas. This would completely defeat the purpose as the flowers would then be intermixed with the peas in such a way as to introduce aphids to the black-eyed peas. The bush varieties are compact and only grow so tall. They are perfect for creating a ‘wall’ and to keep the aphids contained and manageable. I’ll explain more about how to deal with the pests once they are ‘trapped’ in “how to get the most out of your trap crop”.
2. Intercropping or blocks


This method is where a row of the trap crop is alternated with a row of the main crop. The idea is to confuse the pests. Or it’s a block of the trap crop around 8-12 feet away from the main crop. This is supposed to drive the pests to the trap crop block and minimize them in the main crop.
You do need some space to do this method. Many home gardeners may struggle with this method due to a lack of necessary space. I came to the conclusion I don’t have the needed space for this method for it to really work properly. I tried planting a row of marigolds then a row of tomatoes, etc. And I ran into some problems.
It was a very good year for tomatoes and I had a huge, bummer crop! All my tomatoes, even the determinate ones, grew well beyond the size they were supposed to. The marigolds were also very vigorous that year. While I did proper spacing and should have had room enough to walk down the rows and harvest, I had to do a lot of pruning to get to the tomatoes. It did work in terms of pest management, but the extra pruning (for me) negated that. It was also more work as I had extra beds to take care of. The next method is the one I make use of the most–it’s a lot less work!
3. Mixed


Mixed is the method I use the most. It looks like companion planting in how it is executed, but the purpose is different. When using the mixed method, you are planting the trap crop in and amongst the crops you wish to protect. This means less work for me as the trap crops are in the same beds as the crops I’m protecting. Meaning, they get the same water and fertilizer when I water the beds. And as I’m harvesting, I can also check the trap crops at the same time. It’s much more efficient.
Japanese beetles are a problem for me. They like to consume my okra and blackberries to name a few. If you grow roses, you most likely struggle with these beetles too as roses are one of their top preferences to devour.
As zinnias, four o’clocks, and marigolds are some of their favorite delicacies to eat, these are the flowers you want to use. I scatter zinnias all over my garden. They are in with my okra, zucchini, tomatoes and pretty much anywhere I can squeeze them in. You can see them most dramatically as the red and pink flowers in the first picture. Once they are all over the zinnias, I can easily knock the beetles into a bucket of soapy water and then dispose of them.
How to Choose the Right Trap Crop
Identify and Choose
Now that you know the basic principles and methods of trap cropping, how do you choose the right trap crop? This is where patience and planning come into play. The first thing you need to do is, (1) identify the pest you struggle with the most. Start with one pest don’t try to fix everything all at once. (2) Identify the crop that is most infested by that pest. (3) Choose the trap crop for that pest and determine how early you need to plant it before the main crop. You want that trap crop to be at its most attractive (which is when it is flowering) before those pests arrive. (4) Choose the method, remembering the basic principles. I’ll get into more specifics about what plants and pests in a moment.
Evaluate
Don’t miss this fifth step in the process. It’s very important in creating long-term results. Evaluate what worked and what didn’t work and then adjust. Should you try a different method? Do you need to start the trap crop sooner? Or did you start it too soon? Would a different trap crop work better? Or a combination of trap crops?

Remember, trap cropping isn’t a one-size-fits-all solution. It’s one tool of many in pest management. It takes time to find out what works best for you and your setup. Its goal is to reduce the amount of damage to your main crop. While it’s not a magic wand, no matter what you do you should see a reduction of damage and see a reduction of chemicals used in your cash crop.
Tips and Strategies
To get the most out of your trap crop:
- Take care of it as you would your main crop. The trap crop needs to remain attractive to the pests for it to work. It will need water and fertilizer. You will need to mulch and weed it. You want it to be continually blooming and or fruiting to keep the pests interested.
- The trap crop is most effective when it is flowering or going to seed, it needs to be planted 2-3 weeks before the crop you are protecting.
- Be diligent in inspecting the trap crop for pests.
- Once the insects are ‘trapped’, take immediate, decisive action by picking the bugs off and squashing them. Remove any damaged leaves, branches, or entire plants and destroy them/burning them. Or spray with pesticides.
- Remember these are sacrificial plants. This is their job.
- Don’t create a pest nursery. If you don’t kill the pests in the trap crops, you have just created a whole mess of problems for yourself.
- Start with one trap crop as it can be a challenge to manage multiple. Learn and experiment with one. See how much time it takes and then if you have more time add another trap crop.
Step-by-Step Example
Now I’m going to take you step-by-step through how to go about choosing a trap crop. I’m going to use the basic principles and the 5 steps of identifying and choosing.
Step 1.
Identify the pest you struggle with the most–Japanese beetles.
Step 2.
Identify the crop that is most devoured by Japanese beetles. For me, it was okra and blackberries in equal measure.
Step 3.
Choose the trap crop for that pest and determine how early it needs to be planted before the main crop. This is where the basic principles come into play. More often than not, for a home gardener, you will end up using a different species versus a different variety of the same species or even the same variety of the same species. To help you choose the right plant, I have a list of trap crops that give you the crop to protect, what pest you are trying to protect that crop from, and what trap crop to use.
Special Note:
The reason for not using okra as a trap crop to protect okra is the long growing season. Okra will usually produce until frost. So, even with starting the trap crop of okra several weeks before the cash crop of okra, they will still be producing together most of the growing season. This will probably negate the effectiveness. Using a different species for protecting okra is definitely the way to go.
To protect vegetables from Japanese beetles using different species, there are 3 options to choose from: zinnias, four o’clocks, and marigolds. (If you want to protect roses, out of these three, choose four o’clocks) I chose zinnias.
Now, some planning is needed. The trap crop is going to be the most attractive to Japanese beetles when it is blooming and producing fruit or in this case seeds. You want the trap crop you pick to be blooming BEFORE the Japanese beetles come in force, which is usually the start of summer for me.
The advantage of these 3 trap crops is they bloom throughout the summer, especially if you dead-head them. The disadvantage is they can take a while to reach maturity and start blooming. This is particularly true of marigolds.
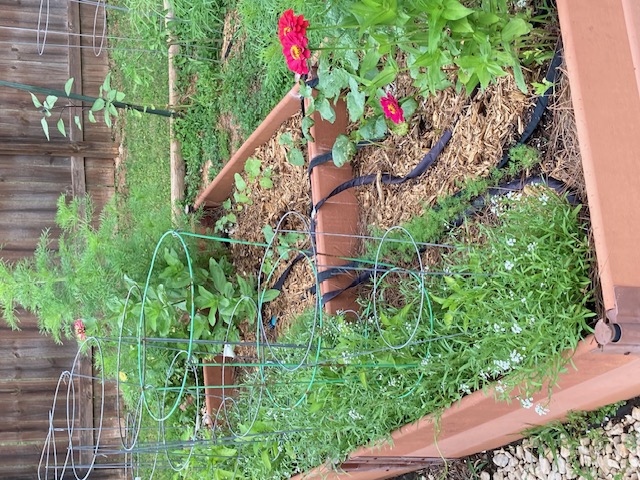
Zinnias mixed in vegetable beds
Using the mixed method of trap cropping, zinnias are in every raised bed. They are also doubling as companion plants.
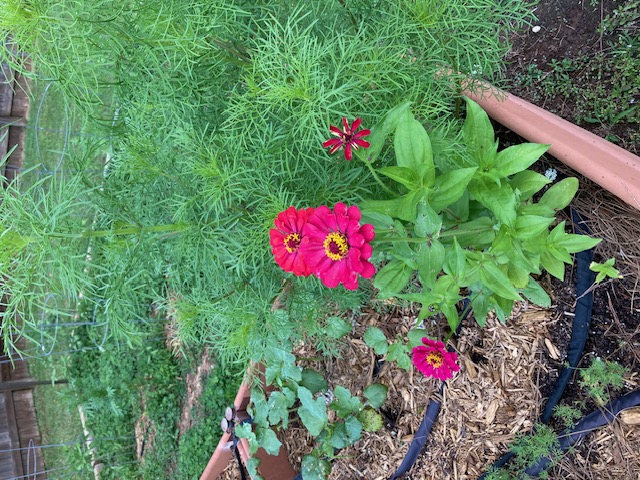
Zinnias blooming before okra is fuiting
The zinnias are blooming before the okra is fruiting and before the Japanese beetles are a problem.
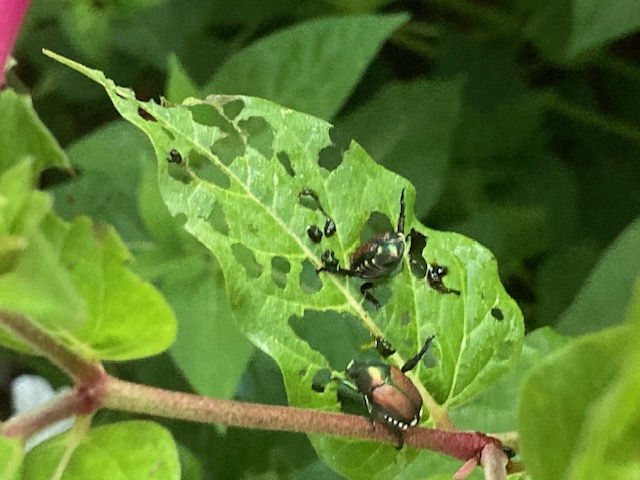
Japanese Beetles wreaking havoc
The trap crop zinnia is doing its job! The Japanese beetles are more interested in the zinnias than in devouring my okra and blackberries!
I recommend doing 1 of 2 things. One, either purchase seedlings and transplant them right after the danger of frost has passed. Or two, start them indoors 6-8 weeks before the danger of frost has passed. Either way, you have a few week’s head start so that they will be blooming sooner. I start mine indoors, but if something fails, I can still purchase them.
Step 4.
Choose the method of trap cropping. Border, intercropping or blocks, or mixed. As I don’t have the space that makes intercropping effective and planting a border of zinnias around my whole garden and blackberries isn’t practical, mixed is the method for me in this situation.
Step 5.
Evaluate. The first year I had just a few zinnias scattered in the vegetable garden. (Keep in mind my garden is very small.) It was something like 3-4 plants. I saw a significant decrease in damage to my okra and blackberries. To be fair, I also have to take into consideration that I had mixed marigolds with my tomatoes. They are close enough to the main vegetable garden that they did double-duty as a trap crop for the tomatoes and Japanese beetles.
In the second year, I planted more zinnias. Every bed now had at least one zinnia plant. The marigolds are still a factor, but if you can find a trap crop that does double-duty like this, that’s gold! It worked even better. I found that it wasn’t extra work for me to have more trap crop zinnias in conjunction with the trap crop of marigolds.
I liked how everything was contained in the same beds. This is a huge time saver for me. When I watered my zucchini and okra, the zinnias were watered at the same time. The same was true with fertilizing and managing the trap crops. I also liked how I didn’t use chemicals or organic pesticides at all!
The only negative thing I can say is that I found the zinnias were very happy where they were planted and liked to get quite large. I had to prune them to keep them from competing for nutrients with the crops I wanted to harvest.
For any pest problem you have, follow these steps to choose the right method and trap crop for your situation and adjust as needed.
List of Trap Crops
These are some very common pests and the trap crops used to trap them. These trap crops are very effective in protecting the species or family of crops that are listed as they are more desirable than the cash crop. That being said, if you struggle with a pest that is listed under a crop you don’t grow, try the trap crop that is listed. Example: Squash vine borers are listed as the pest for cabbage and nasturtium is the trap crop. If you struggle with squash vine borers in your zucchini, try nasturtium.
|
Crop to Protect and Pest |
Trap Crop |
|
Protect: Squash Pests: Cucumber beetle, squash bug, squash vine borer |
Blue Hubbard Squash |
|
Protect: Tomatoes Pest: Tomato hornworm |
Dill
Lovage |
|
Protect: Tomatoes Pest: Eastern leaf-footed bug |
Sunflower |
|
Protect: Roses Pest: Japanese Beetle |
Four O’Clock |
|
Protect: Cabbage family Pest: Aphids (blackfly, greenfly, whitefly), Flea Beetle, Cucumber Beetle, Squash Vine Borer |
Nasturtium |
|
Protect: Vegetables Pest: Stink bug |
Buckwheat Cleome Sunflower |
|
Protect: Roses Pest: Japanese Beetle |
Four O’Clock Geranium
|
|
Protect: Strawberry Pest: Lygus bugs aka: Tarnish bugs
|
Mustard |
Check out my more extensive list of trap crops.
Sources:
Bob Westerfield & S. Kris Braman. “Trap Cropping for Small-Market Vegetable Growers” University of Georgia Extension, 27 December 2017 https://extension.uga.edu/publications/detail.html?number=C1118&title=Trap%20Cropping%20for%20Small-Market%20Vegetable%20Growers
Vern Grubinger. “Perimeter Trap Cropping: A Novel Approach to Insect Pest Control” University of Vermont, July 2004 https://www.uvm.edu/vtvegandberry/factsheets/PerimeterTC.html
Stephen Scott. “Trap Crops—Organic Pest Management for Gardeners” Terrior Seeds, 2021 https://underwoodgardens.com/trap-crops-organic-pest-management-for-gardeners/